Add Facebook OAuth to the To-Do Client
Author: MongoDB Documentation Team
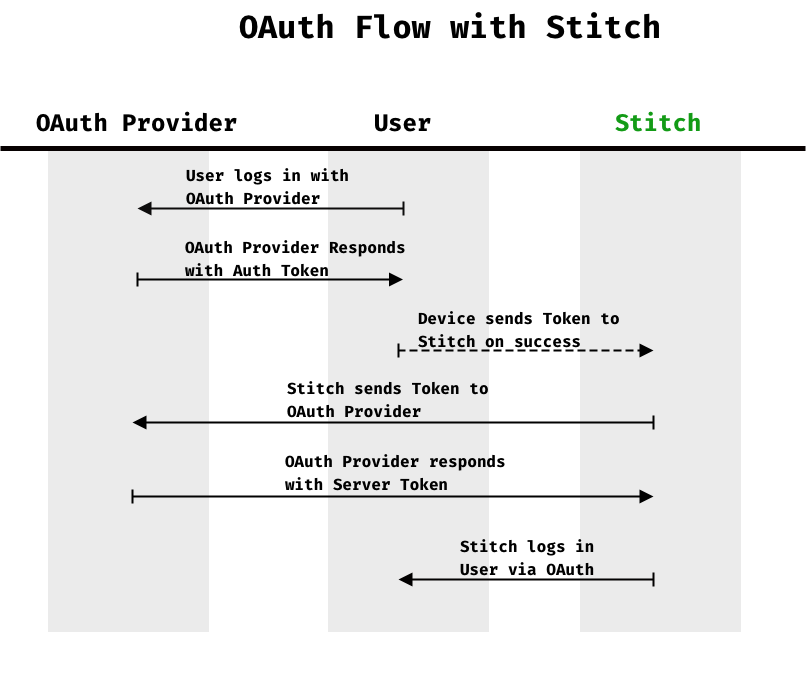
This tutorial walks you through adding the Facebook OAuth provider to your Stitch app and To-do client(s). The following diagram outlines the OAuth process in a Stitch application:
Time required: 30 minutes
What You’ll Need
- If you have not yet built the To-do backend, follow the steps in this guide.
- A Facebook developer account
- If you are building on a previous tutorial, be sure to remove and reinstall node dependencies, so you are working with the most up-to-date SDKs.
Procedure
Note
This tutorial is written with the latest information from Facebook on implementing OAuth in your app. However, Facebook may make changes at any time that would cause some of the following steps to be out of date. To learn about any breaking changes, refer to the official Android and iOS documentation from Facebook.
- Android (Java)
- iOS (Swift)
- Javascript
A. Set up the Backend
To implement Facebook OAuth in your Stitch project, you create a new Facebook client credential, and then enable the Facebook Auth provider in your Stitch backend.
Create an app in Facebook.
To authenticate using Facebook’s OAuth provider, you need to create a Facebook app using your Facebook Developer account. When you do this, Facebook generates an app ID and secret, which you will use to configure both the Stitch backend and your Android app.
Log in to your Facebook Developer account. If you do not have a Facebook developer account, see Facebook - Register and Configure an App. You will also need to create a regular Facebook account if you do not already have one.
Add a new Facebook application.
Once created, your application view opens to Select a Scenario.
Click User Email and Public Profile, and then click confirm. You will be redirected to Basic Settings page for your new app.
In the left-hand navigation, expand Facebook Login, and then click Quickstart.
Depending on which client you are building, click the appropriate platform in the UI, and then follow these steps for that same platform:
- JavaScript
- Android (Java)
- iOS (Swift)
In the Quick Start for Web, there is only one required step:
- For the site URL, enter
http://localhost:3000
The remaining Quick Start steps show you how you can integrate the Facebook login to your Web application. You will not need this information when using Stitch.
In the Quick Start for Android:
You can skip both the Download the Facebook SDK for Android and Import the Facebook SDK steps.
For Tell Us about Your Android Project step, enter the following:
- For Package Name, enter:
- For Default Activity Class Name, enter:
Click Save. You will prompted to verify the Google Play Package Name since your app is not listed publicly on Google Play. Click Use this package name, and then continue to the next step.
Generate the development key hash per instructions, click Save, and then click Continue.
Optional. You can enable/disable Single Sign On, and then click Next.
Copy the
facebook_app_idandfb_login_protocol_schemevalues:Also copy the first element of the
meta-datasection:You will use these entries during the setup step of the
ToDoAndroid project in this tutorial.You can omit the remaining steps as they are already incorporated into the
To-doAndroid project.
In the Quick Start for iOS:
Be sure the development dropdown is set to SDK: Cocoapods.
Enter the following for the bundle identifier
Click Save, and then click Continue
The remaining steps in the Quickstart are not needed at this point and will be covered later in step B.5
In the left-hand navigation menu, under Facebook Login, click Settings.
In the Valid OAuth redirect URIs field, add the following entry, and then save the changes:
In the left-hand navigation near the top, click App Profile. Copy the App ID and App Secret values. You will use these values when configuring the MongoDB Stitch Facebook Auth provider in the next steps.
Configure the Facebook Authentication Provider in Stitch.
Now that you have generated a Facebook app ID and secret, you can enable the Facebook auth provider in your Stitch backend app.
- Navigate to your Stitch application.
- Select Users from the left-side navigation.
- Select the Providers tab.
- Select Users from the left-side navigation.
- For Facebook, click the Edit button.
- In the Facebook provider settings:
- Switch the Provider Status toggle to enabled.
- Enter your new Facebook App ID in the Client ID field and Facebook App Secret in Client Secret field.
- Click Save.
Deploy Your Changes
Before moving on, be sure to Review and Deploy Changes to your Stitch app. You can do this by clicking the button in the blue bar at the top of your screen, or by clicking Deploy in the left sidebar.
B. Update your client
For the client-side app development in this tutorial, you can start with the app you built in the first tutorial or start with an app that already has some of the Android structural work done for you.
Note
If you chose to use your existing app, you will need to create a new layout file and class to handle the logon UI and logic. We recommend you view the layout file in the pre-configured app for ideas on how this might be structured. The steps in this tutorial assume you are using the pre-configured app.
Get the latest code
In the MongoDB Stitch Android tutorial repo, you will use the
facebook-oauth branch, which contains two tags:
facebook_oauth_start, which provides the basic structure for this tutorial, andfacebook_oauth_end, which is the completed app as it should look at the end of this tutorial.
If you have not yet cloned the repo, run the following command:
To get the tagged start for this tutorial, run the following command from the directory of your local repo:
Note that the Android project now includes a LogonActivity.java file and
logon.xml layout file. The layout provides the UI for logging in with
Facebook OAuth, and the LogonActivity class renders the login screen and
handles the authentication process.
Add Google Libraries to Gradle
Open the project-level Gradle file.
Add the following line to the
dependenciesto bring in the Facebook SDK:
Update strings.xml
The strings.xml file holds string variables for your app. The Facebook
login process specifically looks for two values in your strings.xml file:
facebook_app_id and fb_login_protocol_scheme. In
addition, you need to add your Stitch app ID if you have not previously
done so.
- Open the
res/values/strings.xmlfile. - Replace
APP_IDwith your Stitch App ID. - Replace
Facebook_App_IDandFacebook_Schemewith the facebook_app_id and fb_login_protocol_scheme values that Facebook generated during the Facebook setup process.
Add a button to logon.xml
The logon.xml file defines the logon activity layout, which currently only inlcudes a link for logging on anonymously.
At the bottom of the
LinearLayout, add acom.facebook.login.widget.LoginButton. Theandroid:idproperty should be set to@+id/fb_login_button. Your code should look like the following:
Update AndroidManifest.xml
For the default Facebook login button to work correctly, you need to update your manifest file.
Open the
AndroidManifest.xmlfile.Add the following code inside the
<application>section:
Add logon logic to LogonActivity.java
All of the logon logic for this app lives in the LogonActivity class, which
displays the Logon screen when the app starts. Once a user authenticates
(currently only as Anonymous), control is passed to the TodoListActivity
class. We are now going to add the logic for Facebook OAuth to the logon
activity, so a user can choose to authenticate either as Anonymous or with
their Facebook account.
Open the LogonActivity.java file and find the enableFacebookAuth
method stub; you will add the Facebook login logic in this method stub.
In the
enableFacebookAuthmethod stub, initialize theCallbackManager, which is the Facebook class that handles the login response from Facebook. To do this, callCallbackManager.Factory.create():Register the
CallbackManagerwith theLoginManager, which handles the response from Facebook. To get you started, we have added the following method stub, which includes listeners foronSuccess,onCancel, andonError:Add the logic to authenticate with Stitch upon successful Facebook authentication. In the
onSuccesslistener, generate aFacebookCredentialfrom the returnedAccessToken, and then call the Stitch client’sloginWithCredential()method. Make sure to add a listener fortask.isSuccessful(), which indicates that the user is now authenticated against Stitch. In this listener, call the Activity’ssetResult()andfinish()methods to close the Login Activity.When complete, the
onSuccesslistener should look like the following:Add a call to
_callbackManager.onActivityResultin theLoginActivity’sonActivityResultlistener. When complete, the completeonActivityResultmethod should look like this:Finally, make sure that the user is logged out of both Stitch and Facebook when they log out of the app. Otherwise, the app will preserve the Facebook credentials. When a user logs out of the app, we log out of Stitch in the
onClickhandler for the logout button and then redirect to theLogonActivity. So, in thesetupLogin()method (which is called when theLogonActivityloads), you will add code to check if there is a Facebook user logged in, and if so, log them out. Use theAccessTokenclass to get the current access token. If the token isn’t null and hasn’t expired, callLoginManager.getInstance().logOut():
C. Build and Test
You can now run the app (in the emulator or on a device). You will see the logon screen with the newly-added Facebook button:
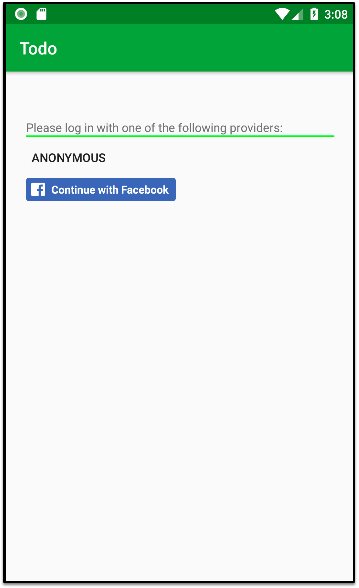
Log in, add some items to your To-do list, and then log out (from the menu). When you log in again with the same account, your to-do list is shown. In addition, if you log on from other client apps that use the same Facebook and Stitch backend app, you will see your your to-do list.
Security Warning
Because of the authentication flow on iOS, Facebook OAuth is NOT recommended for multi-user devices.
A. Set up the Backend
To implement Facebook OAuth in your Stitch project, create a new Facebook client credential, and then enable the Facebook Auth provider in your Stitch backend.
Create an app in Facebook.
To authenticate using Facebook’s OAuth provider, you need to create a Facebook app using your Facebook Developer account. When you do this, Facebook generates an app ID and secret, which you will use to configure both the Stitch backend and your Android app.
Log in to your Facebook Developer account. If you do not have a Facebook developer account, see Facebook - Register and Configure an App. You will also need to create a regular Facebook account if you do not already have one.
Add a new Facebook application.
Once created, your application view opens to Select a Scenario.
Click User Email and Public Profile, and then click confirm. You will be redirected to Basic Settings page for your new app.
In the left-hand navigation, expand Facebook Login, and then click Quickstart.
Depending on which client you are building, click the appropriate platform in the UI, and then follow these steps for that same platform:
- JavaScript
- Android (Java)
- iOS (Swift)
In the Quick Start for Web, there is only one required step:
- For the site URL, enter
http://localhost:3000
The remaining Quick Start steps show you how you can integrate the Facebook login to your Web application. You will not need this information when using Stitch.
In the Quick Start for Android:
You can skip both the Download the Facebook SDK for Android and Import the Facebook SDK steps.
For Tell Us about Your Android Project step, enter the following:
- For Package Name, enter:
- For Default Activity Class Name, enter:
Click Save. You will prompted to verify the Google Play Package Name since your app is not listed publicly on Google Play. Click Use this package name, and then continue to the next step.
Generate the development key hash per instructions, click Save, and then click Continue.
Optional. You can enable/disable Single Sign On, and then click Next.
Copy the
facebook_app_idandfb_login_protocol_schemevalues:Also copy the first element of the
meta-datasection:You will use these entries during the setup step of the
ToDoAndroid project in this tutorial.You can omit the remaining steps as they are already incorporated into the
To-doAndroid project.
In the Quick Start for iOS:
Be sure the development dropdown is set to SDK: Cocoapods.
Enter the following for the bundle identifier
Click Save, and then click Continue
The remaining steps in the Quickstart are not needed at this point and will be covered later in step B.5
In the left-hand navigation menu, under Facebook Login, click Settings.
In the Valid OAuth redirect URIs field, add the following entry, and then save the changes:
In the left-hand navigation near the top, click App Profile. Copy the App ID and App Secret values. You will use these values when configuring the MongoDB Stitch Facebook Auth provider in the next steps.
Configure the Facebook Authentication Provider in Stitch.
Now that you have generated a Facebook app ID and secret, you can enable the Facebook auth provider in your Stitch backend app.
- Navigate to your Stitch application.
- Select Users from the left-side navigation.
- Select the Providers tab.
- Select Users from the left-side navigation.
- For Facebook, click the Edit button.
- In the Facebook provider settings:
- Switch the Provider Status toggle to enabled.
- Enter your new Facebook App ID in the Client ID field and Facebook App Secret in Client Secret field.
- Click Save.
Deploy Your Changes
Before moving on, be sure to Review and Deploy Changes to your Stitch app. You can do this by clicking the button in the blue bar at the top of your screen, or by clicking Deploy in the left sidebar.
B. Update your client
For the client-side app development in this tutorial, we assume you are continuing with the app you built in the first tutorial.
If you would like to follow along with this tutorial, you can clone the
application from the master branch of
stitch-tutorial-todo-ios,
or to see it implemented you can checkout the facebook-oauth branch.
Modify Podfile
It’s time to jump into Xcode. Open your Todo.xcworkspace project and
find the Pods project. Open Podfile and add the following line
after the line beginning with pod 'StitchSDK', ... to add support
for Google Signin.
Exit Xcode, and in the project directory run the following command to have Cocoapods add the new dependency,
Once this is complete reopen Todo.xcworkspace
Modify AppDelegate.swift
Now it’s time to modify AppDelegate.swift to allow our application
to support signing in with Facebook.
First, add the following import right after the line import StitchRemoteMongoDBService.
Now it’s time to set up the Google Sign In instance. Within the lifecyle function didFinishLaunchingWithOptions, add the following code before the window set-up logic.
We must also add a required method that will be called when the OAuth URL is opened.
Modify WelcomeViewController.swift
In the previous version of this application where we only supported Anonymous Login, we were using an AlertController to log in. This worked for our needs then, but now we’d like to show the Facebook Sign In button.
We elect to create a custom Facebook Login button to control the styling and ensure it calls our custom selector.
We also need to add this view controller as a listener to the NotificationCenter
for “SIGN_IN” events in order to move our view flow forward to
the TodoTableViewController. In the future we can use this to add
other authentication mechanisms and reuse the same sign in logic.
Replace the entire contents of WelcomeViewController.swift with the following:
Modify TodoTableViewController.swift
We’re almost finished, only a few items remaining! We need to modify
our logout functionality in TodoTableViewController. We’ll add a
check to determine whether the user was logged in with Facebook. If so,
we’ll call the LoginManager().logout() method. To do
this, we’ll also make sure to import FBSDKLoginKit.
Add the following import to the top of the file:
Now, modify your logout function to match the following:
Add URL Types Information
The last thing we need to do is allow our application to call the Facebook OAuth URL for our iOS client.
To do this, navigate to your Facebook Apps page and select PRODUCTS. Select Facebook Login and then Quickstart.
Follow the steps through step 4a to get the necessary information to
add to your application’s Info.plist file.
C. Build and Test
You can now run the app (in the emulator or on a device). You will see the logon screen with the newly-added Facebook button:

Log in, add some items to your To-do list, and then log out (from the menu). When you log in again with the same account, your to-do list is shown. In addition, if you log on from other client apps that use the same Facebook application, you can see your to-do list and items there.
A. Set up the Backend
To implement Facebook OAuth in your Stitch project, create a new Facebook client credential, and then enable the Facebook Auth provider in your Stitch backend.
Create an app in Facebook.
To authenticate using Facebook’s OAuth provider, you need to create a Facebook app using your Facebook Developer account. When you do this, Facebook generates an app ID and secret, which you will use to configure both the Stitch backend and your Android app.
Log in to your Facebook Developer account. If you do not have a Facebook developer account, see Facebook - Register and Configure an App. You will also need to create a regular Facebook account if you do not already have one.
Add a new Facebook application.
Once created, your application view opens to Select a Scenario.
Click User Email and Public Profile, and then click confirm. You will be redirected to Basic Settings page for your new app.
In the left-hand navigation, expand Facebook Login, and then click Quickstart.
Depending on which client you are building, click the appropriate platform in the UI, and then follow these steps for that same platform:
- JavaScript
- Android (Java)
- iOS (Swift)
In the Quick Start for Web, there is only one required step:
- For the site URL, enter
http://localhost:3000
The remaining Quick Start steps show you how you can integrate the Facebook login to your Web application. You will not need this information when using Stitch.
In the Quick Start for Android:
You can skip both the Download the Facebook SDK for Android and Import the Facebook SDK steps.
For Tell Us about Your Android Project step, enter the following:
- For Package Name, enter:
- For Default Activity Class Name, enter:
Click Save. You will prompted to verify the Google Play Package Name since your app is not listed publicly on Google Play. Click Use this package name, and then continue to the next step.
Generate the development key hash per instructions, click Save, and then click Continue.
Optional. You can enable/disable Single Sign On, and then click Next.
Copy the
facebook_app_idandfb_login_protocol_schemevalues:Also copy the first element of the
meta-datasection:You will use these entries during the setup step of the
ToDoAndroid project in this tutorial.You can omit the remaining steps as they are already incorporated into the
To-doAndroid project.
In the Quick Start for iOS:
Be sure the development dropdown is set to SDK: Cocoapods.
Enter the following for the bundle identifier
Click Save, and then click Continue
The remaining steps in the Quickstart are not needed at this point and will be covered later in step B.5
In the left-hand navigation menu, under Facebook Login, click Settings.
In the Valid OAuth redirect URIs field, add the following entry, and then save the changes:
In the left-hand navigation near the top, click App Profile. Copy the App ID and App Secret values. You will use these values when configuring the MongoDB Stitch Facebook Auth provider in the next steps.
Configure the Facebook Authentication Provider in Stitch.
Now that you have generated a Facebook app ID and secret, you can enable the Facebook auth provider in your Stitch backend app.
- Navigate to your Stitch application.
- Select Users from the left-side navigation.
- Select the Providers tab.
- Select Users from the left-side navigation.
- For Facebook, click the Edit button.
- In the Facebook provider settings:
- Switch the Provider Status toggle to enabled.
- Enter your new Facebook App ID in the Client ID field and Facebook App Secret in Client Secret field.
- Click Save.
Deploy Your Changes
Before moving on, be sure to Review and Deploy Changes to your Stitch app. You can do this by clicking the button in the blue bar at the top of your screen, or by clicking Deploy in the left sidebar.
B. Update your client
For the client-side app development in this tutorial, we assume you are continuing with the app you built in the first tutorial.
If you would like to follow along with this tutorial, you can clone the
application from the master branch of
stitch-tutorial-todo-web,
or to see it implemented you can checkout the facebook-oauth branch.
Add a Stitch Authentication Event Listener
In this section, you will alter the pre-existing React code for anonymous login to be compatible with Faebook OAuth. Namely, you will set up an event listener to determine when login occurs. The Stitch Browser SDK allows you to set up event listeners that can automatically respond to authentication events in your client application, such as when a user logs in or out.
Add the following two functions to
stitch/authentication.js. These two functions add and remove listeners, resepctively, based on a providedlistenerargument. You will build one such listener in the upcoming steps and will then better understand its structure.Now that you can add and remove authentication listeners, you need to actually create a listener object and add it in the React code. Add
addAuthenticationListenerandremoveAuthenticationListenerto your import fromstitch/authentication.jsinStitchAuth.js:Once you’ve imported the functions, you can use React’s effect hook to add the authentication listener when the app first loads and remove the listener when the app unmounts or the user navigates away. Before you can use the hook, import
useEffectfrom React. This is what the very first line ofStitchAuth.jsshould look like after doing so:Now that
useEffecthas been imported, add the following code block directly above thehandleAnonymousLoginfunction inStitchAuth.js:In the exisiting code, there is a
handleAnonymousLoginfunction that (as its name implies) is specific to anonymous login. In this step, you will create the more generichandleLoginfunction, which will allow us to use multiple auth providers. Replace the entirehandleAnonymousLoginfunction with the following:Now that
handleAnonymousLoginno longer exists in your code, you need to change existing calls to it. Scroll down inStitchAuth.jsuntil you find theauthInfofunction. In the line beginning with “actions”, changehandleAnonymousLogintohandleLogin. The result should look like this:You now need to alter the “Anonymous Login” button to call
handleLoginwhen clicked, instead ofhandleAnonymousLogin. Modify theonClickhandler as follows:
At this point, your anonymous login should work exactly as it did before. Now you’re ready to add login functionality for other authentication providers.
Add Facebook OAuth Functions
Your next step in adding Facebook OAuth functionality is to write
a loginFacebook function. The main difference between
loginAnonymous and the
loginFacebook function that you are about to write is the use
of loginWithCredential vs loginWithRedirect.
Some types of authentication, like Anonymous, use
loginWithCredential, which means
that it uses a regular Stitch credential to authenticate the
user. The Facebook OAuth provider, on the other hand, redirects the user
away from the current page to a page owned by Facebook where the user
authenticates. Upon successful authentication, Facebook returns the user
to the original page with a token that proves their identity. The Stitch
SDK uses the token to construct a redirect credential and log the user
in.
Before you can invoke
loginWithRedirectin theloginFacebookfunction, you must addFacebookRedirectCredentialto your import frommongodb-stitch-browser-sdk:In the same file, add the following
loginFacebookfunction.Now that you’ve written your
loginFacebookfunction, you must add it tohandleLogin. Before you can do this, you must first import the function toStitchAuth.js. AddloginFacebookto your import fromstitch/authentication.jsRecall that
handleLoginis meant to handle login across multiple auth providers. In this step, you will give the function the ability to handle login with Facebook OAuth. Navigate toStitchAuth.js, and add the following line of code within theswitchstatement in thehandleLoginfunction.The final step is to create a button to provide the user with the option to login with Facebook. This button is similar to the anonymous login button, but when clicked, it passes
"facebook"as the argument tohandleLogin. Copy and paste the following React code for the Facebook login button immediately below the code for the Anonymous button:
Handle Facebook Redirects
It may seem as though you now have all pieces needed to log in with Facebook. Try running your app to see what happens. You’ll notice that when you click the “Log In with Facebook” button, you get an error. This happens because you haven’t actually handled redirects with Facebook yet. You’ll address these in the upcoming steps.
The first change you need to make is in your Stitch application. In this step, you will add a redirect URI to the Stitch backend. This how you “approve” a specific URL which lets Stitch know that it’s safe to redirect back to a specific domain.
Select Users from the left-side navigation.
Select the Providers tab.
For Facebook, click the Edit button.
In the Facebook provider settings, add the following to the Redirect URIs section:
Note
Port 3000 is the default port on which your app will run. However, if you notice your app is running on a different port, update the port number in the above URI accordingly.
Deploy Your Changes
Again, make sure to Review and Deploy Changes to your Stitch app by clicking either the button in the blue bar at the top of the screen, or the Deploy button in the left sidebar.
Although the
loginFacebookfunction uses redirect credentials, your app currently has no way of knowing when an external login has redirected the user back to the app, and thus, does not actually log the user into the app. In this step, you will add thehandleOAuthRedirectsfunction, which checks that the user has returned to the app, and then completes the OAuth login. Copy the function below intostitch/authentication.js.Import
handleOAuthRedirectsfor use in yourStitchAuth.jsfile. Add the highlighted line to your import fromstitch/authentication.js:Finally, in
StitchAuth.js, add a call tohandleOAuthRedirectsright after the call toaddAuthenticationListenerwithin the effect hook.
C. Build and Test
You can now run the app. You will see the login screen with the newly-added Facebook button.
Log in, add some items to your To-do list, and then log out. When you log in again with the same account, your to-do list is shown. In addition, if you log on from other client apps that use the same Facebook application, you can see your to-do list and items there.
Summary
Congratulations! You now have a working to-do app that includes Facebook authentication.