Blog App: Create the Backend
Author: Stitch Documentation Team
In this guide, we’ll create the backend of our blog. The blog backend needs to:
- store comments for a blog post
- authenticate and authorize users
- find existing comments for a blog post
We’ll store the comments within an instance of MongoDB. However, we can’t just give all users edit permissions for all comments. We need to make sure that users can only create, edit, and delete comments associated with their user ID, a concept known as authorization. We also want to make sure that a user can’t login as another user, a concept known as authentication. To accomplish this, we’ll use MongoDB Stitch, which has a built-in user management system that integrates with MongoDB Atlas using rules to enforce user permissions. We can link our instance of MongoDB Atlas to our Stitch application so we can query our database directly through Stitch. Let’s get started!
Time required: 15 minutes
What You’ll Need
- A MongoDB Atlas account.
- A MongoDB cluster hosted on Atlas. You can create an
M0Atlas cluster for free. To get up and running with a freeM0cluster, follow the MongoDB Atlas Getting Started guide.
Procedure
Create a Stitch Application
Create a Stitch Application to host the back-end of our blog.
To create a new Stitch application:
- Log in to Stitch.
- Click Stitch Apps in the left-hand navigation of the MongoDB Atlas console.
- Click Create New Application.
- Give the application a name (e.g. BlogTutorial) and click Create.
- Wait for your application to initialize. Upon creation of your app, you will be redirected to the Stitch UI.
Turn on Anonymous Authentication
We need to enable an authentication provider so that users can log in and query MongoDB.
From the Getting Started page of the Stitch UI, enable Anonymous Authentication under the Turn On Authentication heading.
Note
This tutorial uses anonymous authentication, but you can configure your app to let users authenticate with another method, such as email/password, Google OAuth, or a custom authentication system based on JSON Web Tokens.
See the Authentication Providers Overview for more information, including a complete list of available authentication providers.
Configure the blog.comments MongoDB Collection
We need to configure rules for the comments
collection before Stitch will allow users to query it.
To configure the collection:
- Click Rules under MongoDB Atlas in the left-hand navigation of the Stitch UI.
- Click Add Collection.
- Enter
blogfor the Database Name. - Enter
commentsfor the Collection Name. - Select No Template
- Click Add Collection.
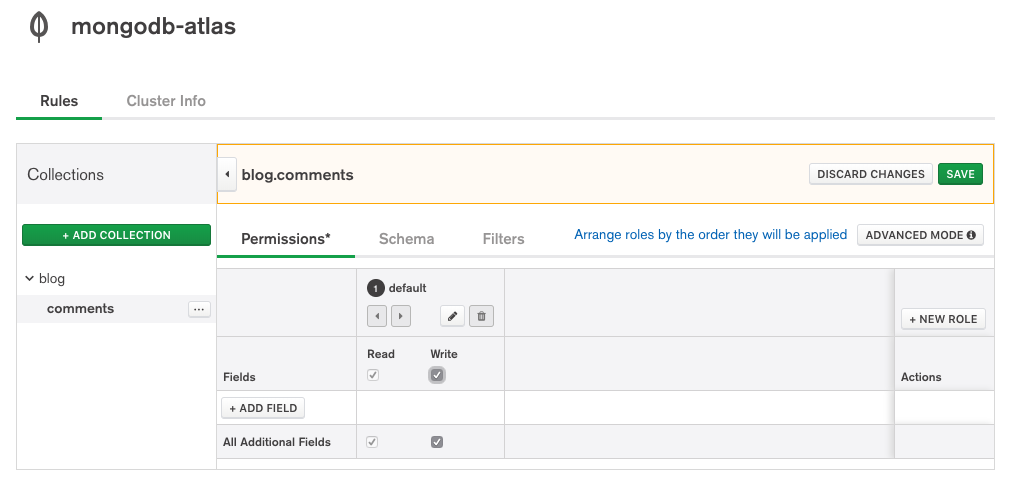
You should now see the Permissions tab of the rules for
the comments collection. The default role doesn’t allow any user
to read or write to the collection.
To enable reading and writing to the comments collection:
- Click the Read and Write checkboxes for the default role.
- Click Save.
Deploy Your Application
Stitch saves changes that you make in a draft state that is not immediately available to client applications. To give client applications access, you must deploy your draft changes. To deploy changes, click Review & Deploy Changes in the banner at the top of the Stitch UI and then click Deploy.
Summary
Congratulations, the blog backend is all set up in Stitch so users can view and comment on your blog!
What’s Next
Use the Blog App: Create a Web Client guide to step through the process of building the web frontend.